Knowing string functions is always useful and saves time to Google the correct function. Hence I have prepared list of most useful, usually used string functions. First of all definition of String …
Source: Javascript string functions
Knowing string functions is always useful and saves time to Google the correct function. Hence I have prepared list of most useful, usually used string functions. First of all definition of String …
Source: Javascript string functions
Filters in angular are used to format/transform data. Here I will show you how to use these predefined filters. We will go one by one filters, I will tell you how to use them in our templates.
Here is plunkr of complete usage of all predefined filters.
Currency: This filter formats currency like we can define franction, symbol etc.
Syntax:
{{ currency_expression | currency : symbol : fractionSize}}
Example:
<p>My money in Dollar : {{1234.23751| currency}}</p>
Output: My money in Dollar : $1,234.24
<p>My money in USD : {{1234.23751| currency:'USD': 5}}</p>
Output: My money in USD : USD1,234.23751
<p>My money in NOK : {{1234.23751| currency: 'NOK':4}}</p>
Output: My money in NOK : NOK1,234.2375
<p>My money in INR : {{1234.23751| currency:'INR':3}}</p>
Output: My money in INR : INR1,234.238
Date: This filter format a string to a date based on the requested format and time zone.
Syntax:
{{ date_expression | date : format : timezone}}
Example:
var indianTime = new Date();
<p>time in india : {{indianTime | date:'HH:mm:ss':'+0530'}}</p>
Output: time in india : 22:37:41
Json: this helps us to format a json object in readable format.
Syntax:
{{ json_expression | json : spacing}}
Example:
<pre>{{ {'name':'value'} | json }}</pre>
Output:
{
“name”: “value”
}
<pre>{{ {'name':'value'} | json:4 }}</pre>
Output:
{
“name”: “value”
}
<pre>{{ {'name':'value'} | json:8 }}</pre>
Output:
{
“name”: “value”
}
LimitTo: used to select a limited number of item from list or array. The elements are taken from either beginning or from end. It filter string or number. If a number is used as input, it is converted to a string.
Syntax:
{{ limitTo_expression | limitTo : limit : begin}}
Example:
<p>{{ [1,2,3,4,5,6,7,8,9] | limitTo:3 }}</p>
Output: [1,2,3]
<p>{{ [1,2,3,4,5,6,7,8,9] | limitTo:-3 }}</p>
Output: [7,8,9]
Lowercase: Converts string to lowercase.
Syntax:
{{ lowercase_expression | lowercase}}
Example:
<p>MY NAME IS {{'jitendra' | lowercase}} IN LOWERCASE</p>
Output: MY NAME IS jitendra IN LOWERCASE
Uppercase: Converts string to uppercase.
Syntax:
{{ uppercase_expression | uppercase}}
Example:
<p>my name is {{'jitendra' | uppercase}} in uppercase</p>
Output: my name is JITENDRA in uppercase
Number: Formats a number as text.
Syntax:
{{ number_expression | number : fractionSize}}
Example:
<p>{{1234.56789 | number}}</p>
Output: 1,234.568
<p>{{1234.56789 | number:0}}</p>
Output: 1,235
<p>{{1234.56789 | number:4}}</p>
Output: 1,234.5679
OrderBy: used to sort items in list.
Syntax:
{{ orderBy_expression | orderBy : expression : reverse}}
Example:
var dataArray = ['jitendra','singhal','arjun','lalu','rahul','mahamahim'];
<p>{{dataArray| orderBy}}</p>
Output: [“arjun”,”jitendra”,”lalu”,”mahamahim”,”rahul”,”singhal”]
I hope you liked this post. Please feel free to write me or comment on this post. Thanks for reading.
The $http is an angular service which help to connect with server, get the response and execute callbacks asynchronously.
$http(config).then(function(){...}, function(){...});
$http function has a config object which tell how to process request. We need to set method type, server url, post data, headers in config object. It always return a promise object.
There are some shortcut methods also available for $http like-
get(url, [config]);
delete(url, [config]);
head(url, [config]);
jsonp(url, [config]);
post(url, data, [config]);
put(url, data, [config]);
patch(url, data, [config]);
These methods returns promise object. If the response object returns with status Code in the 2xx range, then the promise will be resolved by success handler. And other then 2xx range status code will be considered as rejected and handled by error callback.
$http.get(url)
.then(function successCallback(response) {
 // this callback will be called asynchronously
 // when the response has 2xx status code.
}, function errorCallback(response) {
 // called asynchronously if an error occurs
 // or server returns response status code outside in 2xx range(200-299)
});
If you like this post, please follow my blog and comment if you have any queries and concerns.
Happy learning!!
In this post we will cover promises with real time example and code.
Promise is an object that represent result of asynchronously performed action. (Or eventual result of an async operation). We use promise to specify what to do when an operation eventually succeed or fails.
Lets take a scenario, suppose we have a car, which unfortunately met with an accident and broke down. We hired a mechanic to repair it, now analyze it in real life as well angular perspective –
We are here owner of the car act as a (controller in angular) who hired a mechanic to repair it, here mechanic works as service provider (Service in angular). Now mechanic make a promise to repair the car and will return it back in working condition. Based on mechanic promise we make plan for going outside for riding.
Here there could be two turn of events,
1) Mechanic keep his promise and return the car with all the fixes. That means promise made by mechanic is successful. (And we can go outside for riding)
2) Mechanic couldn’t fix car, means promise made by mechanic is get failed (we cannot go outside for riding).
Now understand this with an Angular Code Example:
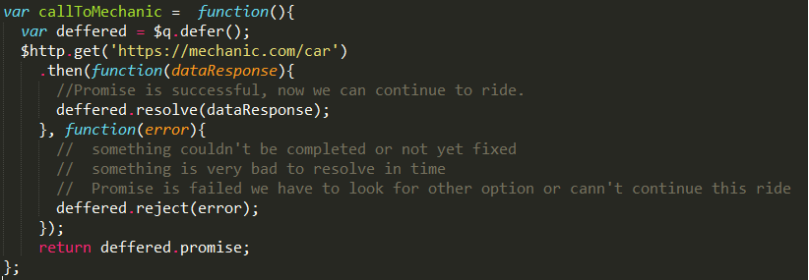
We have $q service in angular, which provide promise object in angularJS.
Now what is deferred ?
An object that represent an asynchronous action in progress, the action can be completed successfully or not. Result of deferred object is also called Promise (Object).
var deffered = $q.deffer();
deferred object two methods resolve() and reject(). When we have resolved and rejected it will always call a callback methods(either success handler or error handler).
when we try to get data from asynchronous call, we don’t wait to get response from api, rather than we just create a promise object which take care to execute success or error handler.
So basically $q service creates a deffer object which return a promise and execute callback methods(success and error handlers) depends on api response.
I hope you liked this post. Please feel free to write me or comment on this post. Thanks for reading.
In previous post on unit testing for angular app, we run our test cases in chrome browser only. We can run unit test cases in other browsers as well to test our implementation for cross browser testing. But we need to follow some steps for this.
1. we need to install other browsers launchers using below commands in git bash or command promt window.
npm install karma-chrome-launcher --save-dev
npm install karma-phantomjs-launcher --save-dev
npm install karma-firefox-launcher --save-dev
npm install karma-safari-launcher --save-dev
npm install karma-opera-launcher --save-dev
npm install karma-ie-launcher --save-dev
**PhantomJS is headless browser. Headless browser helps us to perform unit tests without UI.
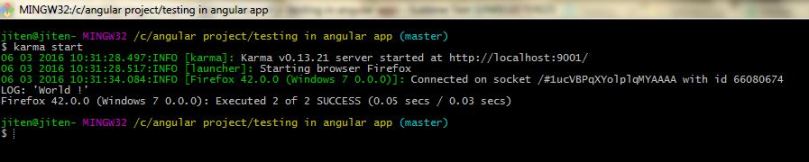
2. Then whichever browser you want to use to run your test cases, change the configuration in karma.conf.js file. Like below we used Firefox.
  //'Chrome', 'Firefox', 'PhantomJS'
 browsers: ['Firefox'],
we can also run unit test cases in more than one browsers together. For this purpose make below changes in karma.conf.js file.
  //'Chrome', 'Firefox', 'PhantomJS'
 browsers: ['Chrome', 'Firefox', 'PhantomJS'],
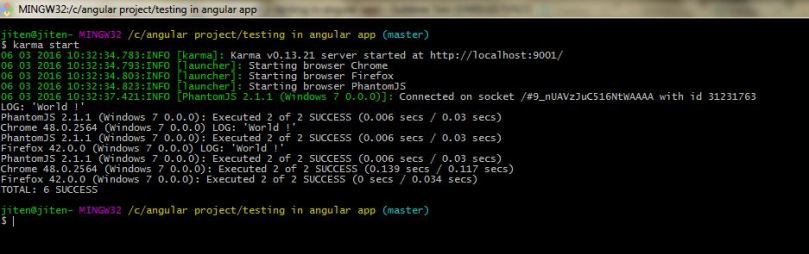
Now If you will see above images, you will find phantomJS is taking very less time than other browsers(chrome and firefox). because PhantomJS is headless browser, that’s why it’s very much popular for running test cases, performance testing etc.
You can checkout complete code from here, just start with README.md.
Thanks for reading. Please feel free to comment if you would like to add anything to this post.
Testing in AngularJS is one of main feature of angularJS. You check my post on testing, how to setup testing environment in angular application.
In this post we will cover how we can extract code coverage, how to setup things for code coverage in angular app. We just need to do two things.
1. first of all install karma-coverage plugin for code coverage using below command.
npm install karma karma-coverage –-save-dev
2. Now lets update karma-conf.js file with additional three things(preprocessors, reporters,coverageReporter).
module.exports = function(config) {
 config.set({
  frameworks: ['jasmine'],
  files: [
   'node_modules/angular/angular.js',
   'node_modules/angular-mocks/angular-mocks.js',
   'src/**/*.js',
   'test/**/*.js'
  ],
  preprocessors: {
   //files for which you want code coverage report
   'src/**/*.js': ['coverage']
  },
  // coverage reporter generates the coverage
  reporters: ['progress', 'coverage'],
  //configure the reporter and folder where you can see code coverag  e report
  coverageReporter: {
   type : 'html',
   dir : 'coverage/'
  },
  port: 9001,
  browsers: ['Chrome'],
  singleRun: true
 });
};
Now run your test cases using ‘karma start’ command and once all test cases have run, check code folder structure, you will find new folder is created ‘coverage‘. Go in this folder and open index.html in your browser. You will see code coverage for your module and file. You can check which statement, function, branch and lines are covered and which are not covered.
Thanks for reading. Please feel free to comment if you would like to add anything to this post.
To add new files to the repository or add changed files to staged area:
$ git add <files>
To commit them:
$ git commit
To commit unstaged but changed files:
$ git commit -a
To push to a repository (say origin):
$ git push origin
To push only one of your branches (say master):
$ git push origin master
To fetch the contents of another repository (say origin):
$ git fetch origin
To fetch only one of the branches (say master):
$ git fetch origin master
To merge a branch with the current branch (say other_branch):
$ git merge other_branch
Note that origin/master is the name of the branch you fetched in the previous step from origin. Therefore, updating your master branch from origin is done by:
$ git fetch origin master
$ git merge origin/master
You can read about all of these commands…
View original post 25 more words
Testing in angular development enable us for test driven development(TDD). In this tutorial I will tell how to start testing in angularJS and how to write test cases for angularJS application.
We will test our “Hello World!” program in angularJS. You can check out complete structured code here.
Now lets create testing environment:
1. First of all, configure your package.json. Atleast 5 node packages are required to run test cases for angular app. For unit testing we required angular-mocks, karma, karma-chrome-launcher, karma-jasmine, jasmine-core npm packages.
2. Along with these 5 plugins, we need angularJS to load before running test cases. Below file is package.json with all required configuration.
{
 "name": "unit-testing-in-angular",
 "version": "1.0.0",
 "description": "Unit testing AngularJS",
 "dependencies": {
    "angular": "^1.5.0"
 },
 "devDependencies": {
    "angular-mocks": "^1.5.0",
    "jasmine-core": "^2.4.1",
    "karma": "^0.13.20",
    "karma-chrome-launcher": "^0.1.12",
    "karma-jasmine": "^0.3.7"
 },
 "scripts": {
    "test": "karma start"
 }
}
3. Let’s open git bash, and run ‘npm install‘ command. Npm will read package.json file and download all dependencies in node_modules folder.
4. Now we need to write test cases. I have written test cases to test ‘firstController‘ in controller-test.js in test folder.
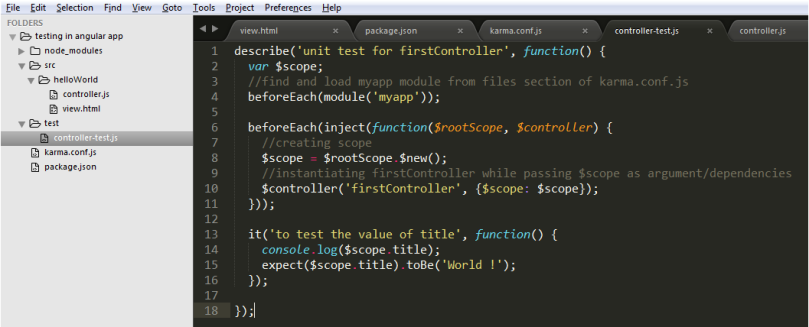
5. Then we have to configure karma-conf.js file.
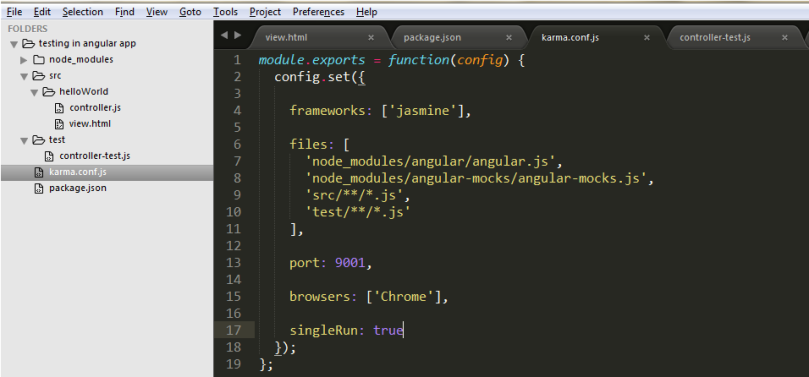
In karma-conf.js file, we tell karma about files to test and test cases, about framework like jasmine, about port , browser etc. While running test cases jasmine framework find test cases and run them. So we just need to tell about files which we need to test and test case files.
6. Lets start test cases using ‘npm test’ command in git bash. You will see ‘npm test’ will execute ‘karma start’ internally and karma reads karma-conf.js configuration file and run test cases.
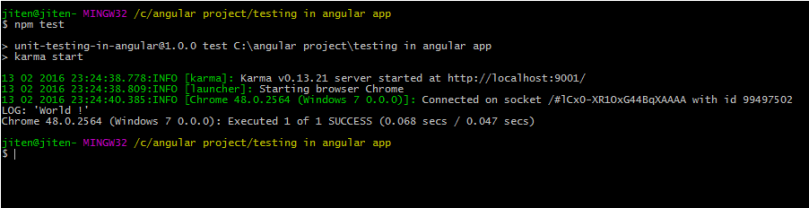
Here in this example we just write one test case for controller and it executed successfully. These 6 steps will help you to set testing environment in your angular app. You can check out complete code here.
If you like this post please follow and subscribe for new posts as well. I will post more about testing in upcoming post. Thanks for reading.
In below code snippet, you see we define firstController in myApp module. And using ng-controller, we have attached firstController to DOM.
 <!DOCTYPE html>
<html lang="en">
<head>
<script src="https://ajax.googleapis.com/ajax/libs/angularjs/1.4.9/angular.min.js"></script>
 </head>
 <body ng-app="myapp">

<div ng-controller="firstController" >

<h2>Hello {{title}}</h2>

</div>

 <script>
 angular.module("myapp", [])
 .controller("firstController", function($scope) {
 $scope.title = "World !";
 });
 </script>
</body>
</html>
Check this plunkr of one more example of controller.
check an example for scope inheritance between parent and child controller.
If you like this post, please follow my blog and comment if you have any queries and concerns.
Happy learning!!
First question came in mind is – what is this Two way binding?
Right, Angular is designed like we can create an MVC front end application. Model is associated to the view. When Model is updated or manipulated on any event then view will be updated and if view is changed then model is updating. This is called as two way binding in angular.
lets take an example and understand two way binding in angular.
<!DOCTYPE html>
<html lang="en">
<head>
    <script src="https://ajax.googleapis.com/ajax/libs/angularjs/1.4.9/angular.min.js"></script>
</head>
<body ng-app="myapp">


<div>
     <input type="text" placeholder="type something" ng-model="title"/>


<h2>Input box value: {{title}}</h2>


</div>


<script>
   angular.module("myapp", [])
    .controller("firstController", function() {
    });
</script>
</body>
</html>
here is plunkr for this example.
In this program, we have a text box and a header. When we write something in textbox, instantly same alphabet will appear in header also.
So what is happening here? The reason is ng-model directive. In text box we have ng-model directive which associate controller’s scope to textbox value and when we write something in text box, it updates scope(model), then wherever ‘title’ is used in html, will be updated.
Here View is updating model and model updating view again. That is called two way binding in angular.
But how angular is implemented this, what is the logic behind this? Yes question is valid and I will explain in upcoming post. You can check my post on binding in angular also.
Please follow our tutorials and comment if you have any queries and concerns.
Happy learning!!
